Reasons to Replace a Shower Head
Replace shower head can transform your showering experience. There are several reasons why you might consider it.

First, an outdated shower head can lead to higher water bills. Newer models are more efficient, using less water while providing a satisfying flow. This is not only good for your wallet but also better for the environment.
Second, mineral buildup can clog old shower heads, reducing water pressure. If you struggle to get a strong spray, a new shower head can solve this problem.
Third, advancements in technology mean that modern shower heads offer better control over water patterns and temperatures. This allows for a more personalized shower experience.
Fourth, replacing your shower head can also be about aesthetics. A new design can upgrade the look of your bathroom with a simple change.
Finally, in some cases, the shower head could be damaged, leaking, or just not functioning correctly. These are obvious signs that a replacement is needed.
Regular inspection will help you decide when it’s time to replace your shower head. Remember to periodically check for consistent water flow, look for deterioration, and you will know when a replacement is due.
When you’re ready to replace your shower head, ensure you have the right tools and knowledge to do it right. The process isn’t complicated when you follow the correct steps, which we will explore in the next sections of this guide.
Tools and Materials Needed for Replacement
Before you replace shower head, gather all necessary tools and materials. This will make the process smoother and quicker. Here are essential items you’ll need:
- Adjustable wrench: This tool will help loosen and tighten the shower head.
- Teflon tape: Also known as plumber’s tape, it’s used to seal the threads and prevent leaks.
- A rag or towel: Protect the shower arm and the new shower head from scratches.
- Old toothbrush or brush: Clean any debris or buildup from the threads on the shower arm.
- Replacement shower head: Choose a model that fits your needs and is compatible with your plumbing.
Before starting, make sure to turn off the water supply to avoid any potential mess. Check the manufacturer’s instructions that come with your new shower head for any additional tools or materials you might need. Gathering all of your tools and materials before you begin will save you time and help ensure a successful installation of your new shower head. Keep in mind that having a bucket may also be useful to catch any remaining water in the line once the old shower head is removed.
Step-by-Step Instructions for Removing the Old Shower Head
Removing the old shower head is straightforward with these steps. Gather your tools, and let’s get started.
- Turn Off the Water Supply: Make sure the water supply to your shower is off. This prevents any accidental spills or water damage.
- Protect the Surface: Lay a rag or towel over the shower drain to catch small parts. This also helps avoid scratches.
- Loosen the Old Shower Head: Use your adjustable wrench to turn the shower head counterclockwise. If it’s tight, wrap a cloth around it to improve grip without causing damage.
- Remove the Shower Head: Once loose, unscrew it by hand. Take care not to drop it.
- Clean the Threads: Use your brush to remove old Teflon tape and any buildup from the threads on the shower arm.
- Inspect for Damage: Look for any signs of wear or damage on the shower arm threads.
These steps will prepare the area for a new shower head, ensuring a clean, secure fit. Keep the old shower head; you might need to refer to it when choosing a replacement.
How to Choose the Right Replacement Shower Head
Choosing the right replacement shower head involves several factors. Here’s how you can find one that suits your needs.
First, consider water efficiency. Look for shower heads with a ‘WaterSense’ label. This means they meet EPA criteria for water conservation. They save water and reduce your bills without sacrificing performance.
Next, think about the spray patterns and pressure. Do you enjoy a gentle rainfall or a strong, massaging jet? Many models offer adjustable settings to suit different preferences.
Then, reflect on installation compatibility. Ensure the new shower head fits your existing plumbing. Check the size and type of the shower arm connection.
Don’t forget design and materials. Choose a shower head that matches your bathroom’s style. Options vary from sleek, modern chrome to classic, brushed nickel.
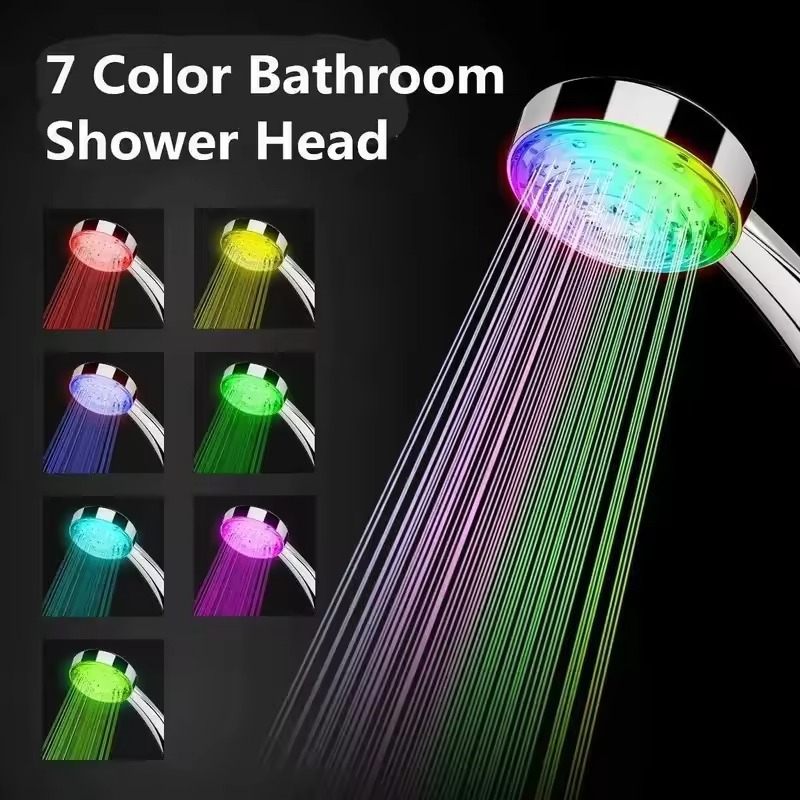
Finally, consider extra features. Some shower heads have built-in filters, LED lights, or technology that changes the water temperature.
Remember, a good shower head combines quality, efficiency, and features that cater to your personal preferences. Take time to research and pick the best one for you. This step is essential for a satisfying upgrade to your shower experience.
Installation Tips for the New Shower Head
Proper installation is key to the performance of your new shower head. Here are simple yet effective tips to help you through the process.
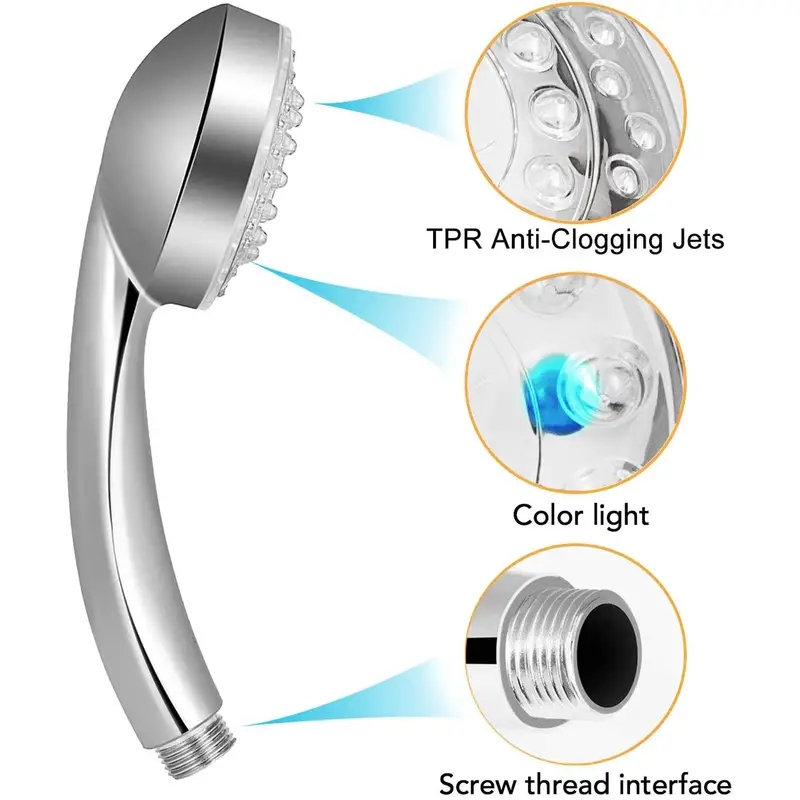
- Check Compatibility: Confirm the new shower head matches the shower arm thread size. This ensures a snug fit.
- Apply Teflon Tape: Wrap Teflon tape clockwise around the shower arm threads. This creates a watertight seal.
- Hand-tighten the Shower Head: Start by screwing the shower head on by hand to avoid cross-threading.
- Use an Adjustable Wrench: If needed, tighten further with a wrench, but protect the finish with a cloth.
- Test for Leaks: After installation, turn the water on to check for leaks. Tighten gently if needed.
Following these tips will help you replace shower head successfully and with confidence. Always refer to the manufacturer’s guidance for specific instructions related to your model. A correct install provides many showers to come, with optimal water flow and no leaks.
Common Mistakes to Avoid When Replacing a Shower Head
Replacing a shower head seems simple, yet mistakes can happen. Let’s look at common ones to steer clear of.
- Not Turning Off the Water: Before you start, shut off the water. This prevents unwanted splashes and spills.
- Skipping Teflon Tape: Don’t forget to wrap Teflon tape around the threads. This helps avoid leaks.
- Over-tightening: Tighten the shower head snugly, but don’t overdo it. Over-tightening can damage the threads.
- Cross-threading: Cross-threading occurs when threads don’t align. Start by hand to ensure proper threading.
- Ignoring Compatibility: Make sure the new shower head fits your shower arm. Wrong size or type leads to problems.
- Not Checking for Leaks: After installation, turn on water to check for leaks. Fix any issues right away.
- Using the Wrong Tools: Use an adjustable wrench, not pliers. Pliers can damage the shower head’s finish.
- Lack of Cleaning: Clean the shower arm threads before installation. Remove old tape and buildup.
By avoiding these common mistakes, you’ll ensure a proper fit and function. Remember to follow the manufacturer’s instructions closely. Take your time and double-check each step for a smooth replacement process. This will result in a satisfying and leak-free shower experience.
Maintenance Tips for Your New Shower Head
Maintaining your new shower head is important for its longevity and performance. Here are simple, yet crucial tips to keep it in top shape:
- Regular Cleaning: Every week, wipe the shower head with a damp cloth. This removes soap scum and prevents mineral deposits.
- Deep Cleaning: Monthly, unscrew the shower head and soak it in vinegar. It dissolves build-up that can block water flow.
- Check for Leaks: Occasionally, inspect where the shower head connects to the arm. Look for drips that indicate a loose fit or worn-out Teflon tape.
- Replace Teflon Tape: If you spot a leak, rewrap with new Teflon tape. Ensure it’s snug and leak-free after re-tightening.
- Check for Clogs: Look at the nozzles for lime or debris. Use a needle to gently clear any clogs.
- Avoid Harsh Chemicals: Harsh cleaners can damage the shower head’s finish. Stick to mild detergents and water for cleaning.
By following these maintenance steps, you’ll ensure that your shower remains a refreshing and efficient part of your daily routine. A well-maintained shower head will save you water, money, and the hassle of frequent replacements.


